
One of my hobbies is Advanced Squad Leader, a board game first published in 1985 (and deriving from the original 1977 Squad Leader). Well, when I say it’s one of my hobbies, it’s sort of two: one hobby is collecting it and another is wishing I could play it. Time is not really the problem here; instead, it’s finding players who are interested. However, one of the problems with finding players is this: it’s very hard to offer someone a sample game of it if I don’t have it with me! Well, I’ve started bringing it into Good Games Ballarat of a Friday afternoon (yes, today was Thursday, but I was on holiday), and I’ve been lucky enough to get in a couple of games.
The game I played this afternoon was with Mick, who was once part of my Pathfinder game before it ended. Mick plays a lot of miniatures wargames (mostly Games Workshop ones – Warhammer or 40K) and he’s played more than a few other boardgames with me; today was his first experience with Advanced Squad Leader. I’m happy to say that he enjoyed the game, and we’re likely to play again in the near future, presuming we’re both free and I have the game with me!
Because portability and playability are actually important, I just had my ASL Starter Kits with me. One plano box of counters and one small box of maps, rules and scenarios: easily portable compared to the full game. I’ve played enough of the SK rules to have memorised most of them – the full game I’d be looking up a lot of rules; it’s much better to introduce someone to a game that you know how to play. ASL is not a simple game; the Starter Kit rules make it a lot more approachable, but it still isn’t anything near simple, especially if you’ve been playing games like Carcassonne!
However, the basic rules are pretty simple. It’s the exceptions that catch you. I know the SK exceptions well, and so I was able to give Mick an overview of the rules and deal with all the intricacies whilst he dealt with the actual business of playing the Russians in Stalingrad, defending against the German (me) attackers.
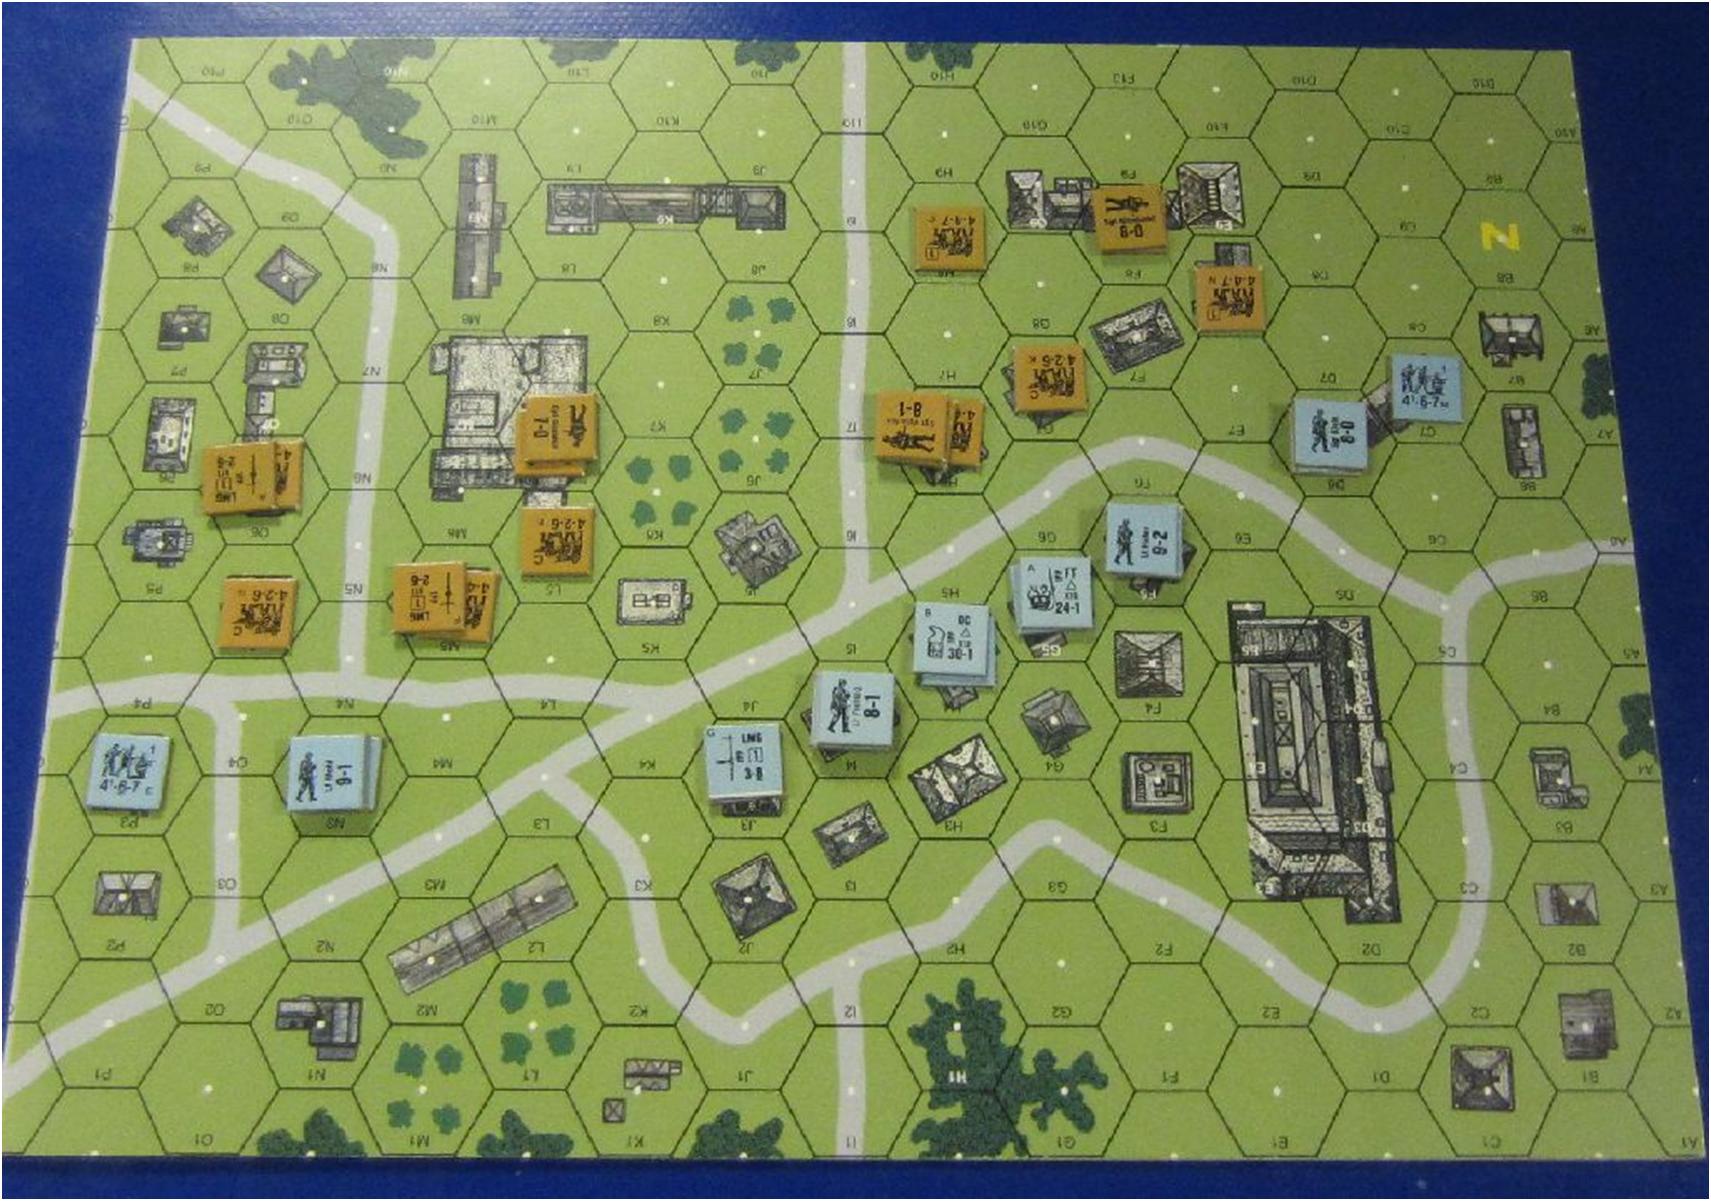
That’s the set-up at the beginning of the game: I was on the north side (bottom) of the road; my blue Germans looking across the road at Mick’s poor Russian units to the south (top). In this game, the Germans are on the offensive – they have to capture three buildings. Which ones? Well, one of them is the five-hex building to the left of centre. The others are the two-hex building just to the left of hat one, and finally the three-hex building on the far right (Mick has his 8-0 leader in it). Mick’s units are a combination of 1st line troops and conscripts, whilst I have superior German first line troops along with some elite engineers armed with demolition charges, machine guns and a flame-thrower. Defending this was going to be tough for Mick, but he did have reinforcements coming. Some time. (He’d roll a die at the beginning of each turn after the first, and if he rolled low enough, they’d arrive).
I ordered my troops so that I had a couple of effective units to the left (one armed with my medium machine gun – MMG) that could pin down Mick’s forces on that side, whilst my other units used their great numbers and better weaponry to cross the street and begin engaging for control of building F8.
It sort of worked – I made a big mistake when my far left unit (the 4-6-7 in P3) advanced adjacent to the Russian conscripts and was broken; far better to keep them back and just engage in (mostly ineffective) firing) or wait for a better chance to cross. Meanwhile, Mick discovered that I had placed my flamethrower (FT) within range of his MMG, and that unit and its leader decided that running away was far better than facing the flame.
In Mick’s turn, he pulled back his forces on the right-hand side to better protect the objective building; oh, that and he decided to run across the north-south street bisecting the map to get to the left-hand side – my German squad manning the LMG covering that street managed to pin his leader and force his squad to retreat, broken. Not the best of plans!
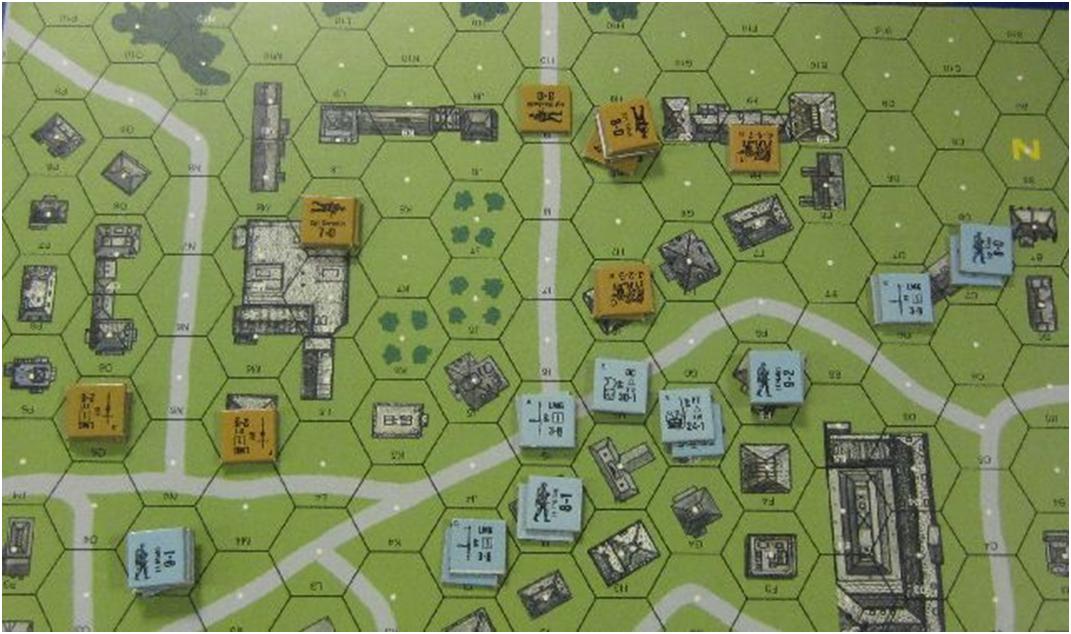
Mick had brought up his conscripts to man the MMG my flamethrower had caused so much trouble with. Guess how that worked? Yeah, not that well. They broke under the flame-thrower’s attack, and found themselves surrounded. They quietly left the game in shame. With Mick’s forces now in retreat, I was able to cross the street with most of my forces, but taking the near buildings did bring me in range of Mick’s few defensive guns, and he didn’t roll poorly. One of my units decided that discretion was the better part of valour, and returned to the building from which it had started, far away from Mick’s small arms fire.
Mick then got lucky – he rolled a 1, and his reinforcements entered the battlefield. They made their way into the main objective building, prepared to repel Germans! One of the interesting things about watching Mick play was his economy of fire – he tended to not blaze away at anything that moved, instead firing only when he knew where everything was going. He forfeited a few bonuses that way, but occasionally it worked.
Mick also brought his forces into melee with my invading force, eliminating them. He also was doing very well against my MMG post; pinning and breaking units there so they couldn’t affect the battle well enough. He’d lost control of the right-hand building by now, but his defense of the other two buildings was looking a lot better – it was getting bloody, as units were breaking everywhere, especially when they crossed the street!
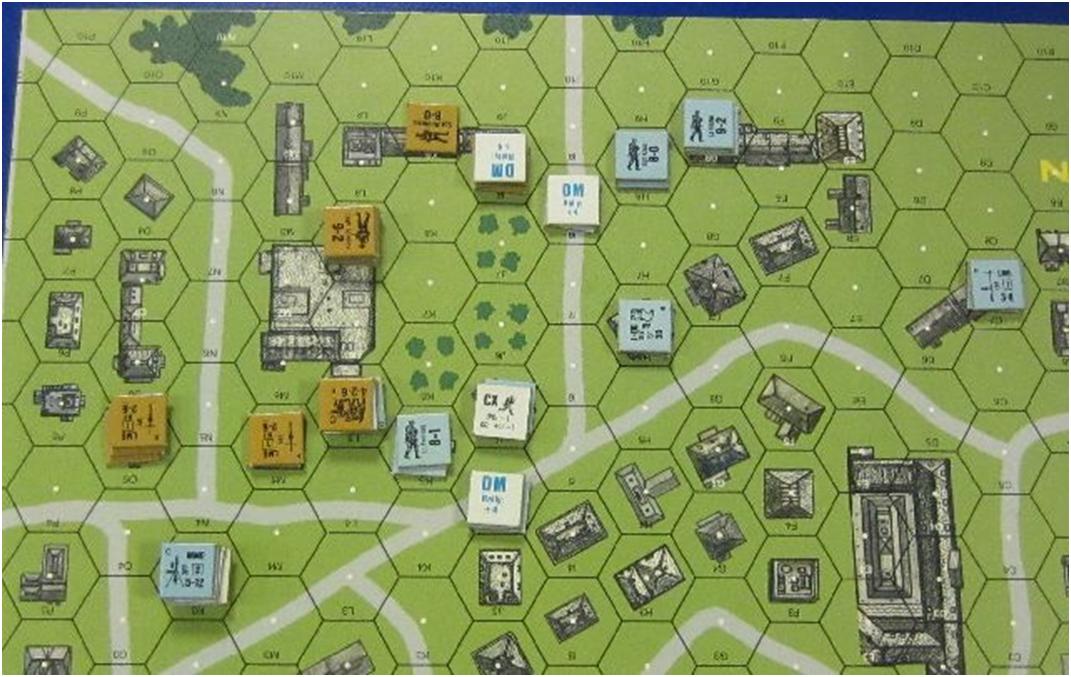
The blue counters indicate the unit has just broken, or is broken and still under fire – they’re “Desperation Morale” counters, and they make it harder to rally the units. They need to ge away from it all and sit down with a pot of tea. The black CX counter (Counter eXhaustion) is because that unit was moving very quickly to reach its current position, and now needs to rest a bit – it’s also carrying a flame thrower! The LMG unit on the far right of the map is actually broken. It’s sat down for tea, and perhaps a few scones as well. Without a leader, it has a lot of problems rallying (it can try to self-rally, but it wasn’t doing that very well). Eventually I got sick of it and moved one of my leaders up to it to rally it!
Mick and I had a few close combats now; if you end movement and survive defensive fire whilst adjacent to another unit, you can move into its hex and fight it in a very bloody close combat. The first one I’d performed in F8, where I was successful in ambushing his units and they’d disappeared without fighting back. The next two combats were initiated by Mick; the first was a successful ambush against a pinned unit, the second just a bloody attack against one of my squads. Both came out in Mick’s favour, and suddenly I was looking much weaker than I had been. It didn’t help that my good leader with the MMG had been wounded, and the effectiveness of my MMG was, by now, quite reduced.
I was now getting up in to close range with Mick’s men; the flamethrower was invaluable at keeping him back, but there was enough cover that I couldn’t always have line of sight to where it needed to be.
I’d moved my men up, with not much time left on the clock before time ran out and Mick won by default (remember, I needed to capture the three buildings!) Mick then had a really fantastic set of rally rolls and attack rolls, which broke my major units, and left me badly out of position. I tried to run my remaining men up, but it was a losing battle, I knew it. Mick didn’t roll poorly, and my remaining men broke.
So were a lot of Mick’s men, but, importantly, he hadn’t lost control of his two remaining objective buildings. There was still his final turn left, but I wasn’t about to magically win in that turn, so we called the match over – Mick had won his first game!
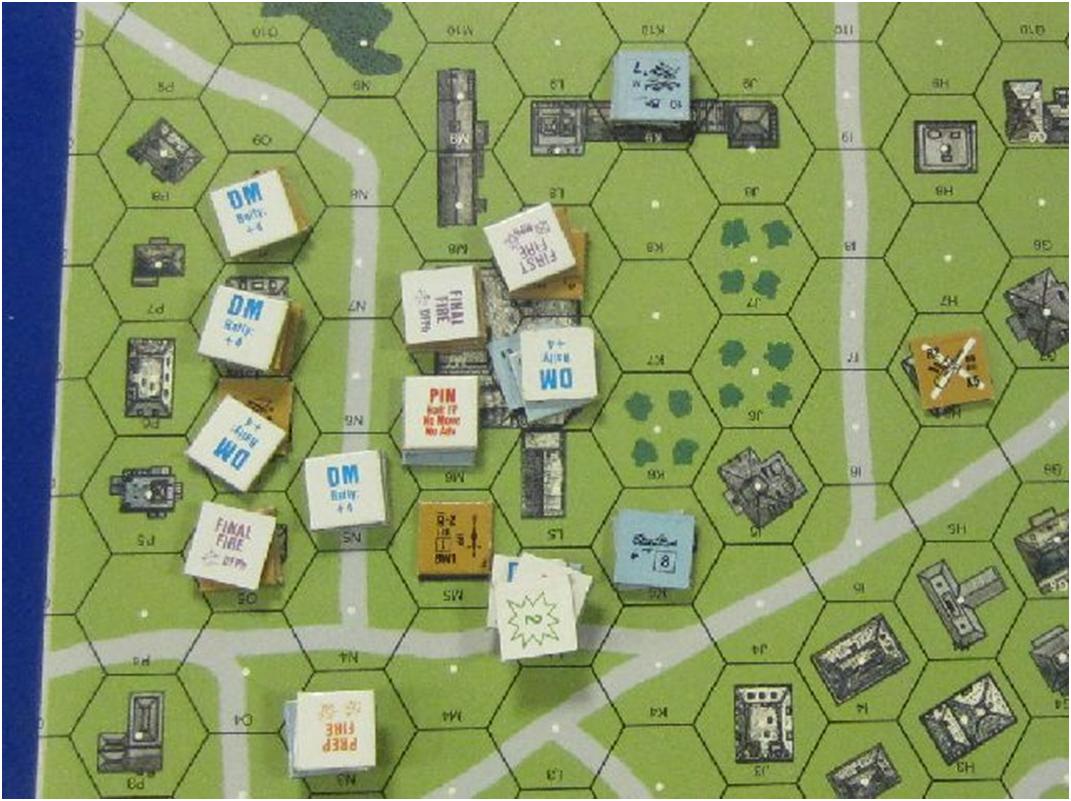
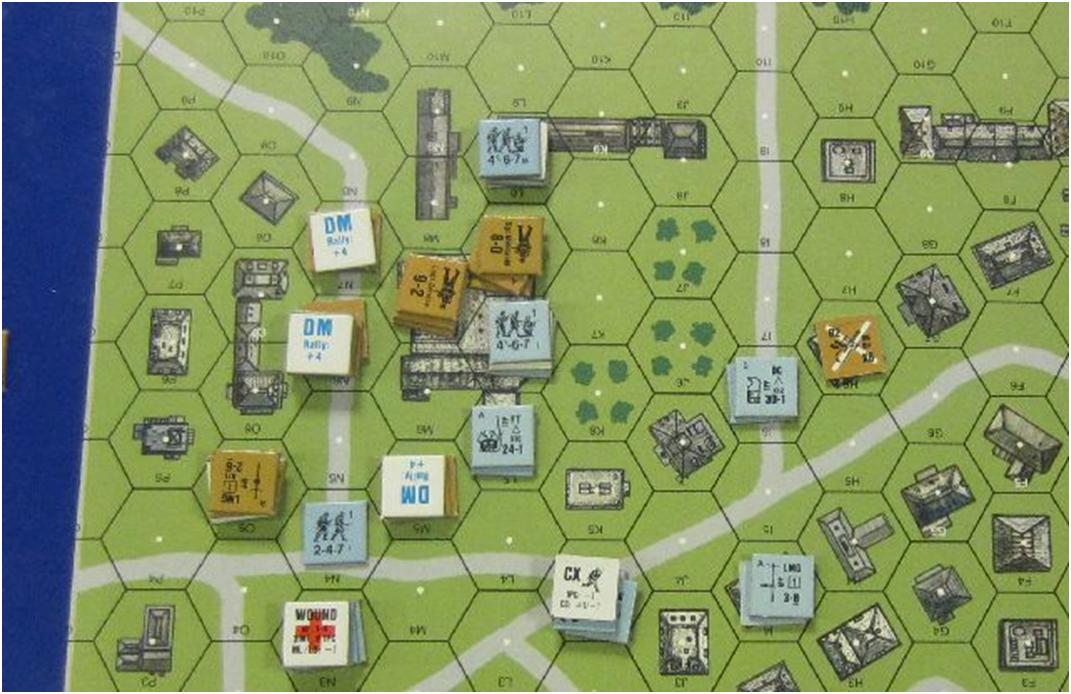
My only unbroken troops remaining were pinned! Mick had only three stacks of unbroken troops – but they were enough for the victory. The last picture is during the movement phase with lots of informational counters visible: Pin, Desperation Morale, First and Final Fire (Mick’s troops firing defensively). Prep Fire counters (my units firing before combat) and a residual fire counter – any of my units moving into that hex would take more fire. If only I had more units to move!
The game took us two hours to play, which is probably a little less time than two players completely new to the game, and a little more time than two players quite experienced with the system. Unfortunately, I never got the chance to use my Demolition Charges – Mick’s defensive fire took out the units before they could emplace them! I’m not 100% sure of the rules, so some rulebook searching would have been in order.
So, that was today’s game of ASL. Mick and I really enjoyed playing the game. I’m really hoping to train someone else so they can play a campaign game (most likely Decision at Elst) with me. But any ASL is good at the moment; it’s been a while, and it’s a game I really enjoy when I get the chance, even if I am not all that good at it!