
The monster lair is an essential part of most Dungeons & Dragons play. Whether it is a bandit encampment, a dungeon full of monsters, or a noble villa, you are likely to come up against one form of it or another in the game.
My players played through one of the quests last night of Sleeping Dragon’s Wake, one of the follow-on adventures to the D&D Essentials Kit. It features an attack on an outpost of sahuagin. If you are interested in which one, it is the Leilon Point mission. (You get the adventure when you redeem the code in the box, or by purchase of the content on D&D Beyond, Roll20, or Fantasy Grounds).
I think this is a difficult quest. Apart from a small number of regular sahuagin, a party of four also face 6 sahuagin priestesses and 4 sahuagin blademasters. The enemy begin scattered over four areas in the cave complex.
This is a small set of caves and one thing is certain: There is little room to manoeuvre.
Constraints of a Grid
When we look at the first room as it appears in Roll20, this is how it appears:
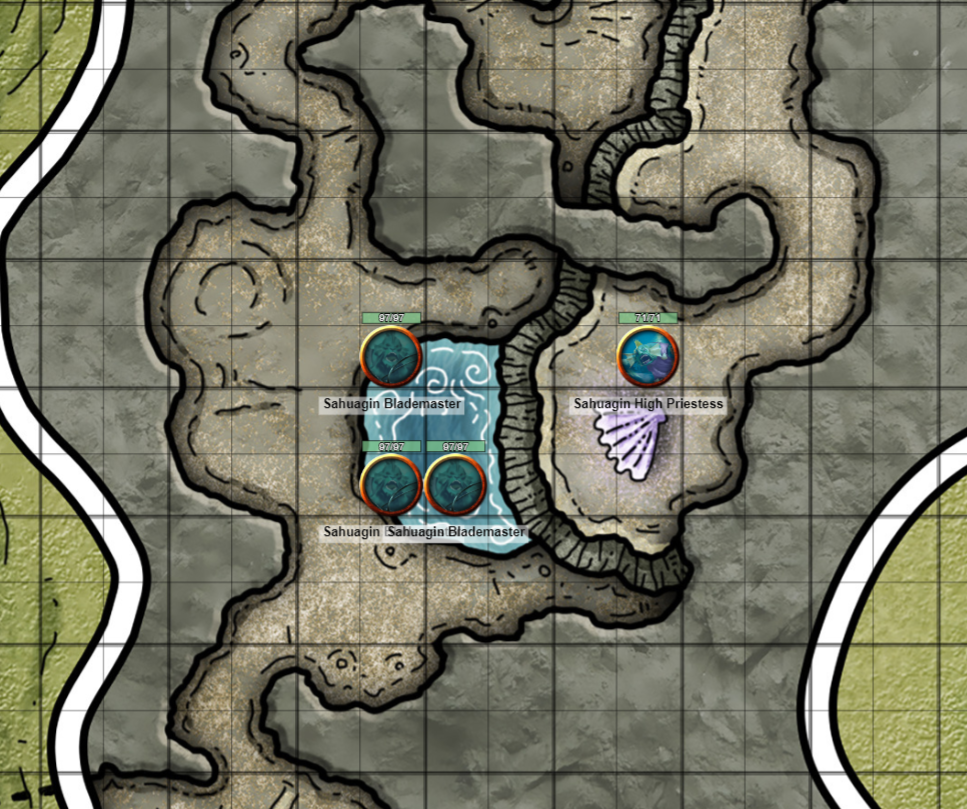
Note the width of the main entry way (from the south). You can also see how the spaces for reinforcements (from the north) are likewise narrow.
When you run games using Theatre of the Mind – that is, no maps or tokens – then you could often look at a map like that and assume there is room for a lot of free movement within. When you play it one a grid, then things gum up quickly. This is the map for four characters. If you had six, an extra blademaster appears.
Remember also that moving through a friendly space is slower, so arranging yourself within the bounds of initiative to be in a good position is trickier than it might first appear in a narrow area.
The ledge is ten feet high. That is more area that is hard to get to.
None of these are wrong decisions, but they affect how the battle plays.
How Big Does the Battle Get?
The initial battle (for a party of four) is against 3 blademasters and a priestess. That is a challenging encounter, but one that a well-rested party should handle.
However, in any lair, there are likely more potential foes around who can reinforce the action. In this case, we have
- 1 Sahuagin Blademaster and 8 Sahuagin about forty feet away as the corridor bends (in the northern chamber next to the ledge)
- 5 Sahuagin Priestesses and 1 Skeletal Giant Shark about sixty feet away along the corridor to the north
There are no doors or sources of other noise. When the battle starts, everyone is going to notice!
At that point, about 19 opponents try to pack into the room. There is not enough space!
This keeps the sahuagin from overwhelming the party, but it does lead to the odd state of a lot of sahuagin standing around unable to reach their foes!
There is a solution in this case: alternative avenues of approach. The obvious is by the ledge to the east, but sahuagin can also leave the caves and enter by another entrance. If you use this option the battle might get very dangerous for the characters.
Setting the Difficulty Level
If you play the sahuagin to their potential, how difficult is this encounter?
Using the Encounter Builder on D&D Beyond, I get the following numbers:
- Typical Deadly Encounter XP budget (four level 9 PCs): 9600
- This Encounter XP (unadjusted for numbers): 15850
- This Encounter XP (adjusted for numbers *4): 63400
If the characters fight all the sahuagin at one, it is likely to be very difficult – perhaps a Total Party Kill!
The main adjustment to make this easier would be in tactics. If the sahuagin stay in their areas, we get three distinct encounters:
- High Priestess and Blademasters: 17400 (Deadly)
- Blademaster and Sahaguin: 7750 (Hard)
- Priestesses and Giant Shark: 8100 (Hard)
Greater delays between the waves of monsters also help reduce the difficulty. Constricted terrain can help players against greater numbers of foes. And the potential of a rear attack makes the battle significantly harder!
Designing Tactics
This scenario does not suggest many tactics to the DM. It uses a basic strategy: the sahuagin attack when they become aware of the characters.
I have found it helpful when designers give an idea of what the monsters do when they encounter the adventurers, especially in a complex lair. You can find a set of such tactics in The Forge of Fury, the second adventure in Tales from the Yawning Portal. These tactics not only show what the overall strategy of the orcs is, but also provide a round-by-round breakdown if the characters do not interfere!
Most of the time you do not need that much detail. And many DMs are happy to make this material up themselves. However, including a description of how the fight may go helps the DM understand its shape.
There are three questions to ask yourself as a DM or designer about a lair:
- How do the monsters react when first encountered?
- What do the monsters do when they start to lose?
- What do the monsters do when the party retreats?
I do not see the last considered in most published adventures, but it can be key to running a good lair scenario.
Sharkmen Tactics
I used a variation of these tactics when running the scenario:
How do the monsters react when first encountered?
The sahuagin attack. If encountered from the south entrance (the default one), the High Priestess uses hold person and banishment to disrupt the adventurers’ lines. The blademasters engage in melee (and may grab and shove characters into the pool where the swarm of baby sharks swim.
The middle group come to reinforce the battle, with one or two of their members alerting other groups of sahuagin in the lair.
All sahuagin move to engage by the most direct method they can — noise alerts everyone very quickly! If the path is blocked, send a group around to attack the adventurers from the rear.
What do the monsters do when they start to lose?
A fighting retreat towards the shrine is their first option, alternatively the northern cave – anywhere they can use their superior numbers to surround the adventurers.
If they are losing badly (taking casualties while not inflicting them on the party), a full-blown retreat is on the cards – fleeing the stronghold and off to the sea.
What do the monsters do when some are killed and the party retreats?
If at least half the elite sahuagin remain (the blademasters, priestesses and high priestess), they stay in place and recruit. Roll a d6 at the beginning of each day: the number indicates the number of new sahuagin that join the outpost. On the roll of a 5, a priestess joins as well. On the roll of a 6, a blademaster.
If more than half the elite sahuagin are killed, then the sahuagin slip back into the sea, taking all portable treasure with them.
Final Thoughts
This is a challenging encounter, both to run and play.
If you want different monster groups to remain in their areas, then either you need to ensure there is enough space between areas – or doors! – or to detail tactics explaining why this is the case.
We came very close to a TPK in this encounter, partly due to the use of hold person by the priestesses. The group contains a rogue (arcane trickster), a cleric, a barbarian, and a monk. While the cleric employs spirit guardians to great effect, otherwise they lack area effect spells.
With the barbarian and monk repeatedly held, it was only by the dint of enough healing magic that the party survived at all. The combat took about 2 hours to play, and ended with four priestesses and giant shark still alive; the party had slain the high priestess, blademasters, and regular sahuagin.
The good news for the party was that escape routes were plentiful, so they took one. The priestesses decided not to chase due to the casualties they had already suffered. With more than 50% of the elite forces down, they will now decamp, leaving Leilon Point in peace.
Great article!
This gives a lot to think about when planning maps for encounters. As I was reading this I was trying to compare it with the goblin cave in the Starter Set, and it was due to the loud sound of the water than ambushes coming from different rooms didn’t happen. These are important things to take into consideration as well!